This Help topic refers to the following editions:
þ Enterprise þProfessional þ Personal
DocuXplorers Text Zone OCR process speeds up the process of performing manual data entry. Simply place OCR zones around the text that appears in your document and watch the information be transformed into text and placed in the selected Index Set fields. Save your OCR Zones as templates to be used over and over for documents that are arranged in the same format.
Zone OCR helps to automate data extraction from digital images. However, zonal OCR, and OCR in general, is not entirely accurate and review of the extracted data will be required.
In this help section you'll learn how to:

Select the Create Standard OCR Template from the ribbon tab OCR Tools
You will be ask to provide a name fro your template. This Template will be associated with the current index set
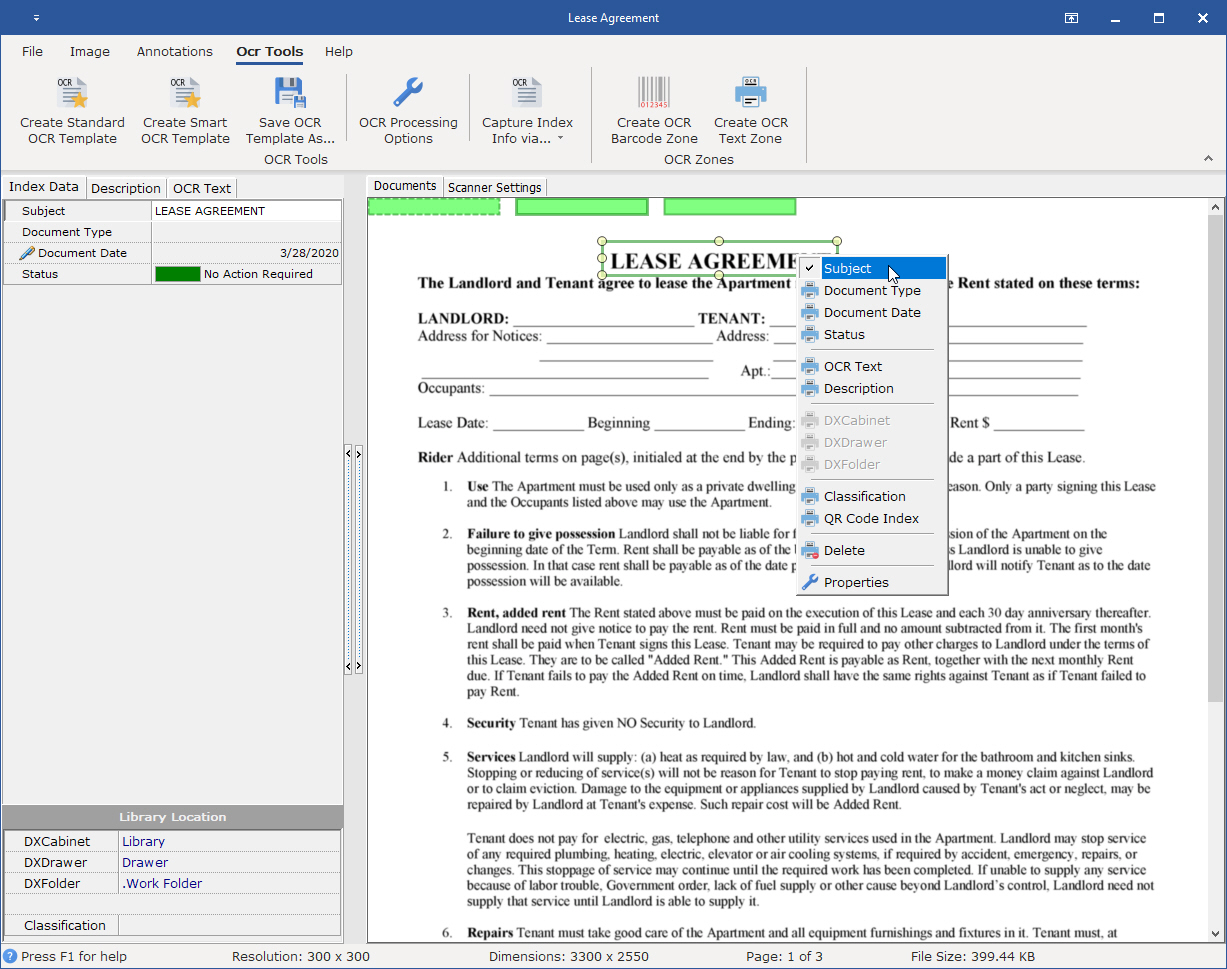
Three special zones will be created for you at the top of the screen,
The first one on the left represent the Cabinet the document will be placed in. Then next zone represents the draw then the folder These zones will fill their information on the bottom left of the screen respectively
Select Create OCR Text Zone and drawer a box around the text to be OCR'd
Once you finish drawing the box and release the mouse, a popup menu will be presented for you to select the Index Field the text should be placed in.
Notes:
If the OCR zone is being used as part of an OCR Batch Scanning process, there are three additional items to select from, Cabinet, Drawer and Folder. When using the OCR Batch Scanning process, the new document will be stored in the location assigned to the Cabinet, Drawer and Folder field values.
Edit an OCR Zone
Adjust any OCR zones behavior by right clicking the zone and selecting properties
Select the Icon on the tool bar that looks like an arrow (Image Selection Cursor)
Right click the OCR zone and select Delete
Select the Icon on the tool bar that looks like an arrow (Image Selection Cursor)
Click and hold the left mouse button down on the selected OCR zone and drag to the desired location
Select the Icon on the tool bar that looks like an arrow (Image Selection Cursor)
Left click the desired OCR Zone, note the tag marks on each corner, left click and hold and drag tag marker to the desired size location